Author: Denise I Biteye content team, Bbo I XHunt operation team
Recently, while browsing X, I saw that everyone was using Clawdbot for various tasks with AI agents, and I suddenly felt that liberal arts students could also play with code in a "vibe" way, so I started this hands-on experience from scratch.
Vibe Coding is seen as a new paradigm of "demand equals code," and it is even expected to "enable non-programmers to build tools."
However, a real issue always exists: when the technical threshold is lowered, does the ability to implement it also follow?
To answer this question, I, as a user with no coding experience, fully experienced three mainstream Vibe Coding tools.
The process was not smooth: I encountered pitfalls, failures, and repeatedly had to start over, but because of this, I figured out where the most common problems arise and how to avoid these pitfalls.
This article is not a tool review but a genuine record from cognition to practice.
1. Concept Understanding: What is Vibe Coding?
This is a new development model that focuses on "just providing requirements, without worrying about writing code."
The concept was first proposed by former OpenAI co-founder Andrej Karpathy, who said:
"This is a new way of programming that I call Vibe Coding. You completely hand it over to feelings (Vibes), embrace exponential efficiency growth, and even forget about the existence of code."
In the Vibe Coding model, you are no longer a "construction worker," but more like a "product manager" or even a "client."
Your task is to accurately tell the AI: "I want to build a house, there should be a floor-to-ceiling window here, and there should be a swimming pool there."
If you are not satisfied, you just say: "It doesn't feel right, change it."
That's Vibe!
2. Pitfall Guide: The Safety Red Lines of Vibe Coding
Before opening the door to AI programming, you must first secure your "treasury." Many beginners unconsciously send sensitive information to AI during conversations, which is extremely dangerous.
1. Three Types of Data That Must Never Be Leaked
API Key: Equivalent to a "stored value card" for various platforms; if leaked, the balance will be instantly drained.
Private Key / Mnemonic Phrase: Absolutely, forever, do not send to any AI or write in any code files. Once leaked, your on-chain assets will be zero.
Cookie Data: Some tutorials will teach you to obtain cookies from the browser for automation, but cookies contain your login status. If leaked, others can log into your Twitter, Discord, or even exchange accounts without a password.
2. Core Principle: Environment Isolation, Data De-sensitization
Never write API Keys or sensitive information directly in code or prompts.
The correct approach is to use "environment variables," allowing the code to read the system variable names instead of directly reading the key content.
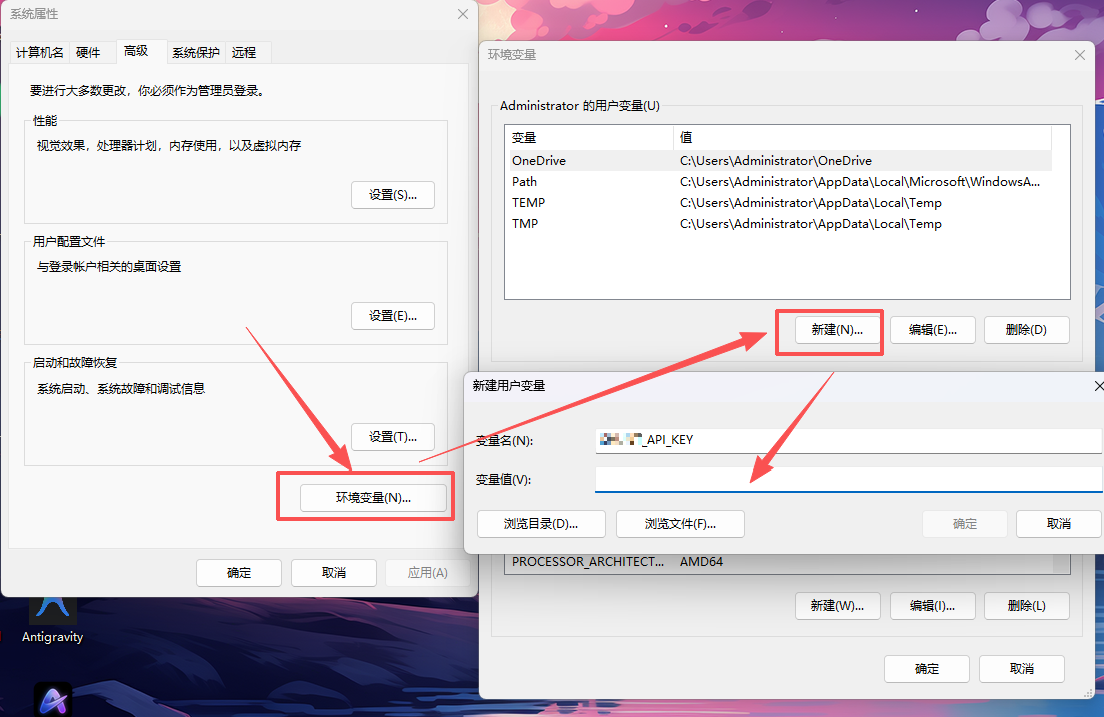
The configuration steps for Windows are as follows:
Press win+s on the keyboard, search for "Environment Variables"
Create a new variable
Enter the variable name and value, then save
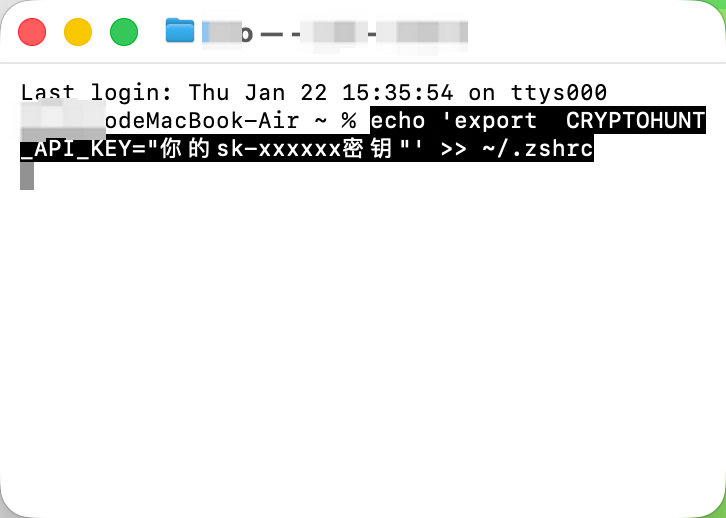
The configuration steps for MacOS are as follows:
Press Command + Space on the keyboard, search for "Terminal" and open it.
In the pop-up black box, copy and paste the following command (make sure to replace with your actual Key), then press Enter:
echo 'export CRYPTOHUNT_API_KEY="your sk-xxxxxx key"' >> ~/.zshrc
To make the configuration take effect immediately, continue typing and press Enter: source ~/.zshrc
(Optional) To verify success, type: echo $CRYPTOHUNT_API_KEY. If your key is printed on the screen, the configuration is successful.
3. Practical Experience (Failures) Review: Three Tools, Three Experiences
Having covered the theory, let's dive into practice. To find the most suitable tool, I tried three mainstream tools. The reason for choosing them is that they each represent one of the three mainstream forms of Vibe Coding:
Google AI Studio: Represents the lightweight route of "rapid prototype generation"
Antigravity: Represents the engineering route of "AI agent + local full-stack development"
Lovable: Represents the abstract route of "conversation equals application"
If you just want to know which tool is most suitable for zero-based direct implementation, you can jump directly to the third tool, Lovable; if you want to avoid detours, I recommend reading this section in full. Let's start the review in order.
1. Google AI Studio
Positioning: Suitable for individual developers and startup teams
Experience: Focuses on "speed" and "free," allowing you to validate an AI idea in just a few minutes
Official website: https://aistudio.google.com/apps
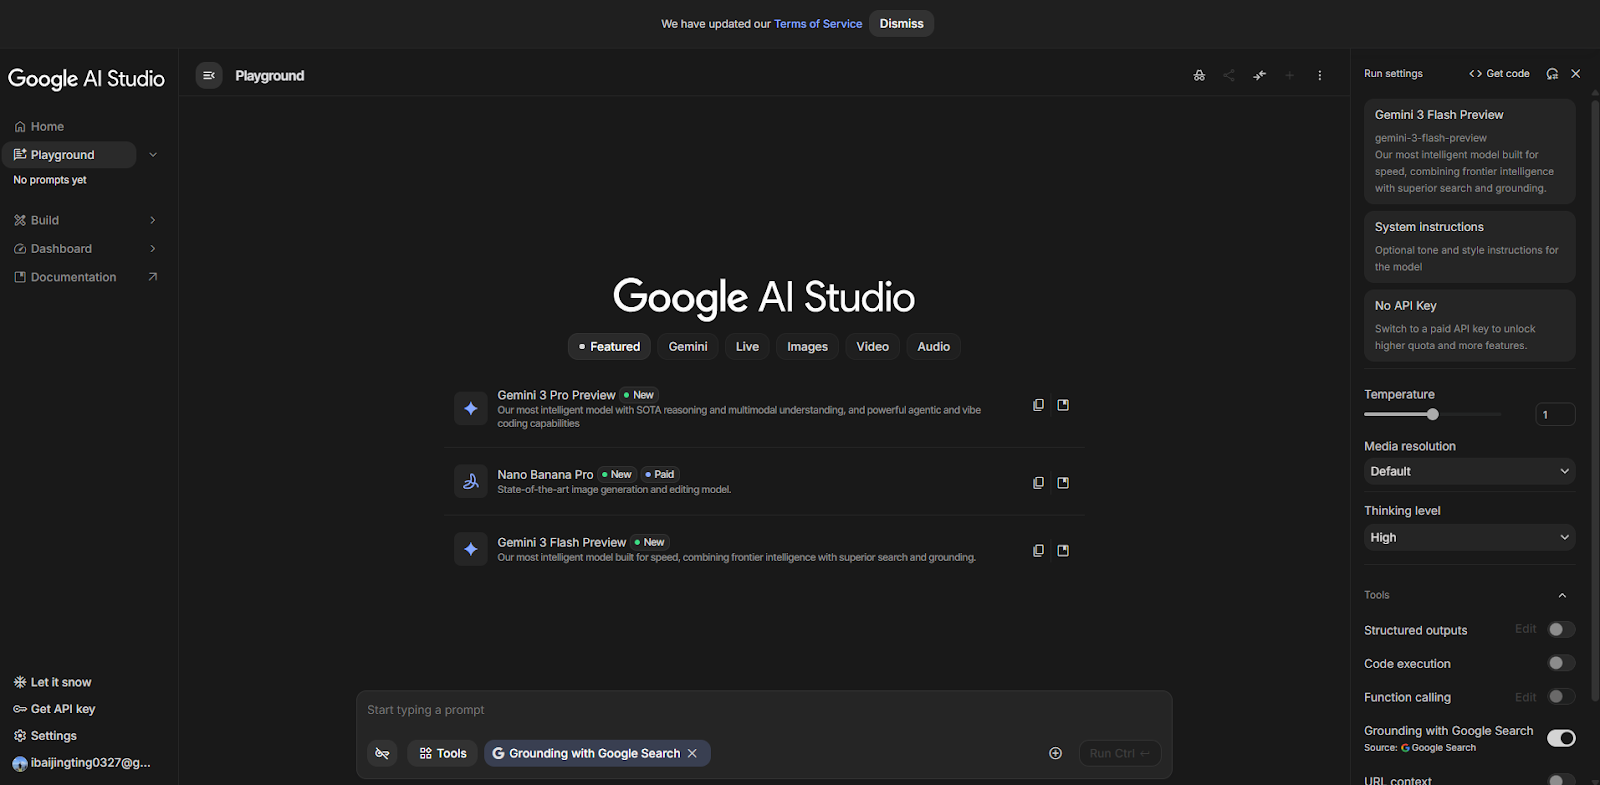
The first time I used it was on Christmas. Everyone was making cyber Christmas trees, and I tried it out too. I casually threw in a prompt, and in just 5 minutes, it generated a very beautiful 3D page, with particles flowing with gestures, and the effect was extremely smooth.
This made me marvel at how times have really changed.
(Think about how in the past, a tech guy would stay up late writing a string of code to impress a girl, and after running it for a long time, if it produced a beating heart, he would feel very cool. And now? You can completely hand it over to vibe coding, and it can instantly maximize emotional value.)
With the support of successful cases, I began to feel "inflated," so I started doing something serious: calling the Cryptohunt API to create a Twitter data dashboard.
I confidently fed it the API documentation. Everything started smoothly, the backend logic was instantly connected, and the data was successfully fetched. I thought: Is that it?
However, when I asked it to display the data beautifully on the frontend, the nightmare began:
Charts not displaying? It changed the code.
Displayed but incomplete? It changed the code again, resulting in broken interactions.
Fixed the interactions? Now the API data wouldn't load again.
I found myself trapped in an infinite loop of "fixing bugs—creating new bugs." After spending 2 days, I gave up.
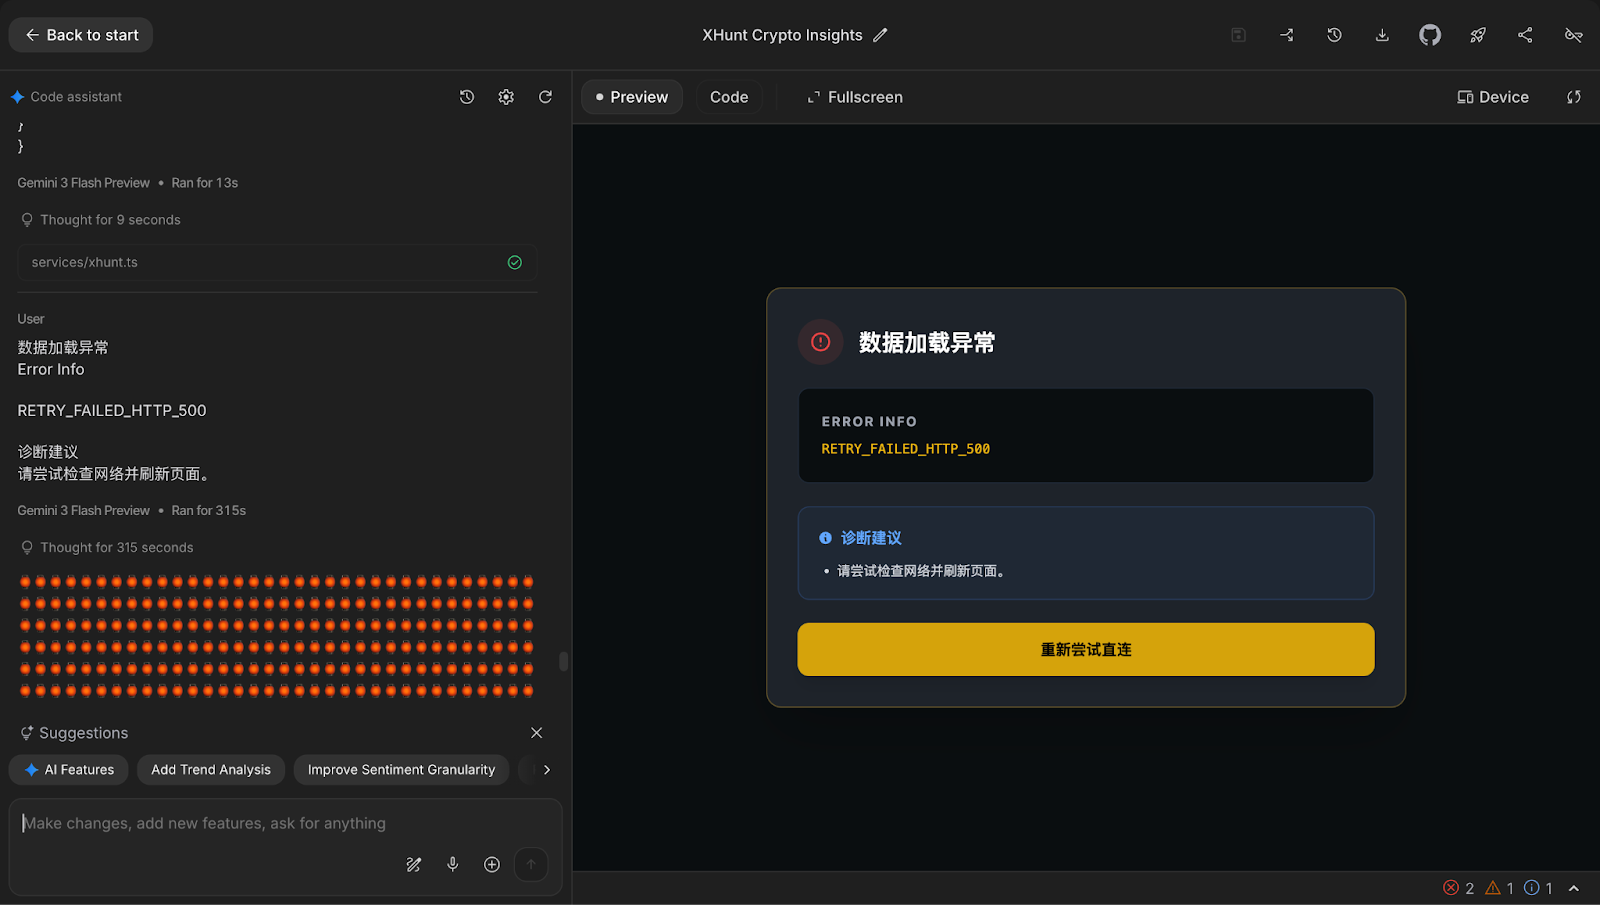
Final display image (AI has started to give me nonsensical drawings)
Pitfall summary: Google AI Studio is a specialized student. It excels at creativity and making a single-page demo, but once it involves deep integration of front and back ends (like API data flow + complex frontend display), it easily overlooks critical aspects. If you completely don't understand code logic, you can easily get stuck in a dead end of frontend display like I did.
2. Antigravity
Positioning: An integrated full-stack development tool with multi-model switching
Features: Multi-model switching, task decomposition, automatic testing
Official website: https://antigravity.google/
During actual use, before I even started writing code, I was almost deterred by its login process. Unlike most tools that allow you to jump right in after opening the webpage, it has quite strict requirements for accounts and network environments.
The account restrictions are not determined by your current network IP but by the "associated country/region" of your Google account. If the region setting is not on the support list (e.g., mainland China, Hong Kong), the system will directly reject your login. My requests to change the region were also rejected several times.
After going through the entire process, I can only describe it in one sentence: it was exhausting.
After experiencing three account bans and multiple environment switches, I found a workaround for logging in: Antigravity tools.
Start by setting a US IP + global tun mode.
Download Antigravity tools.
Link shared by a Twitter user: https://x.com/idoubicc/status/2004848130693759213
After downloading, add your account and start OAuth authorization.
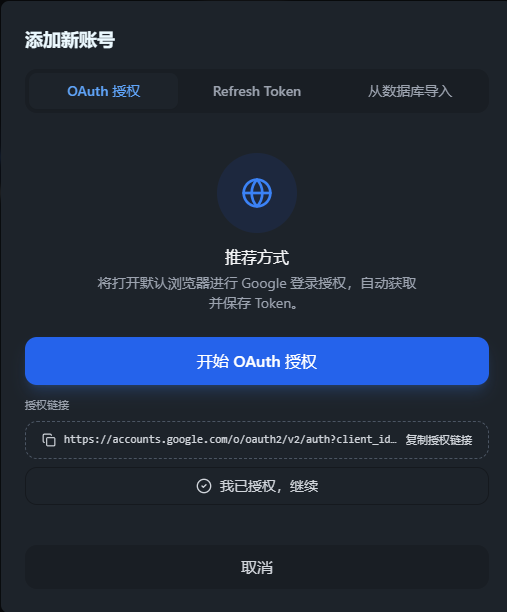
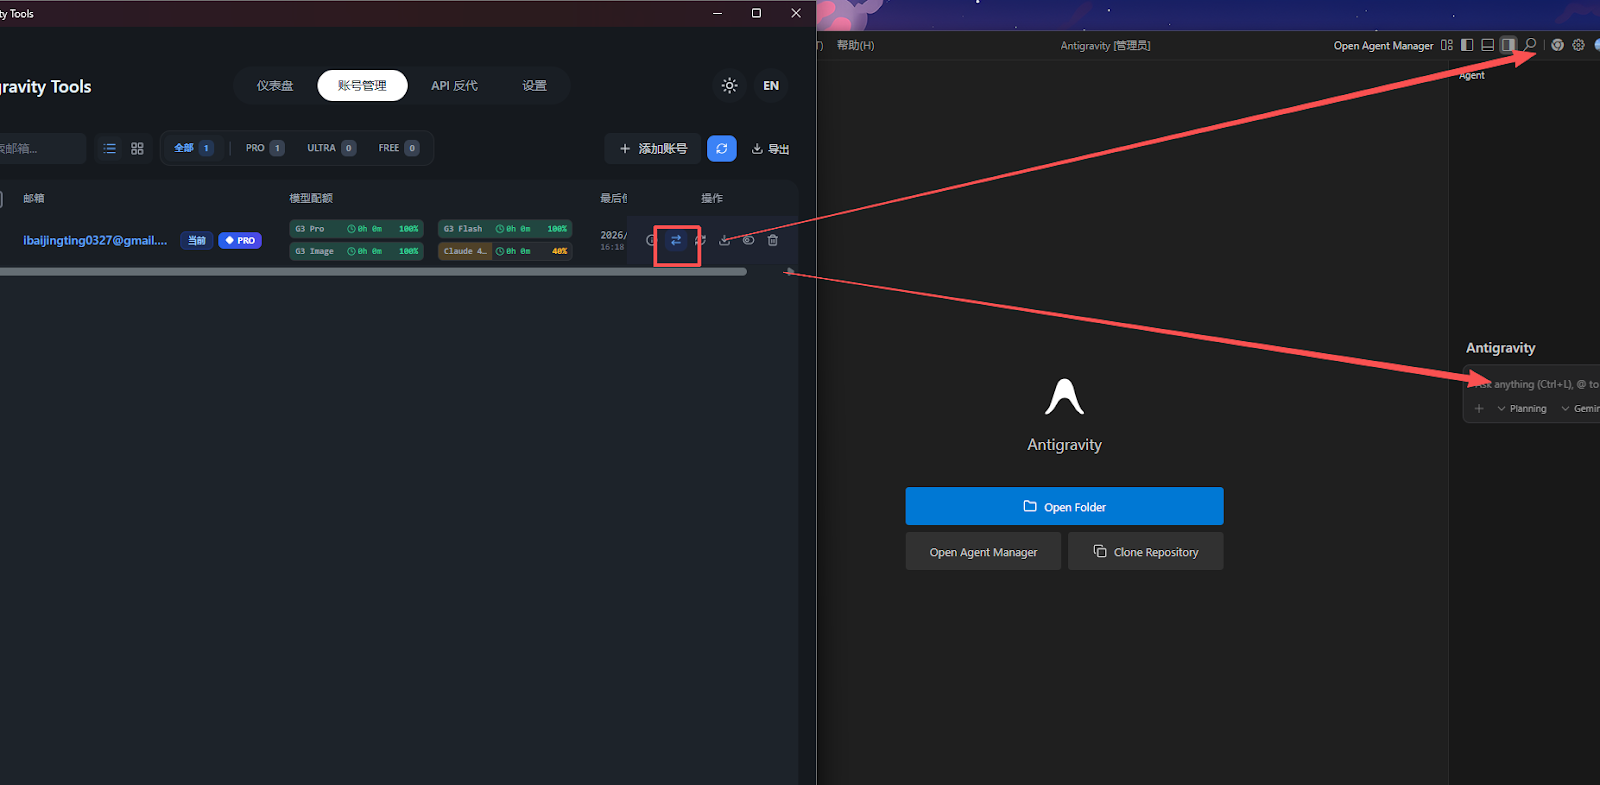
4) Once authorized successfully, you can jump to the login page and visually see your model quota.
(Risk Warning: Antigravity Tools is an open-source project that facilitates the integration of Antigravity models with tools like Claude Code. However, during the Vibe Coding process, it is recommended to isolate the operating environment from asset wallets or important accounts to reduce potential security risks.)
Once inside the tool, I also summarized two extremely important tips for beginners:
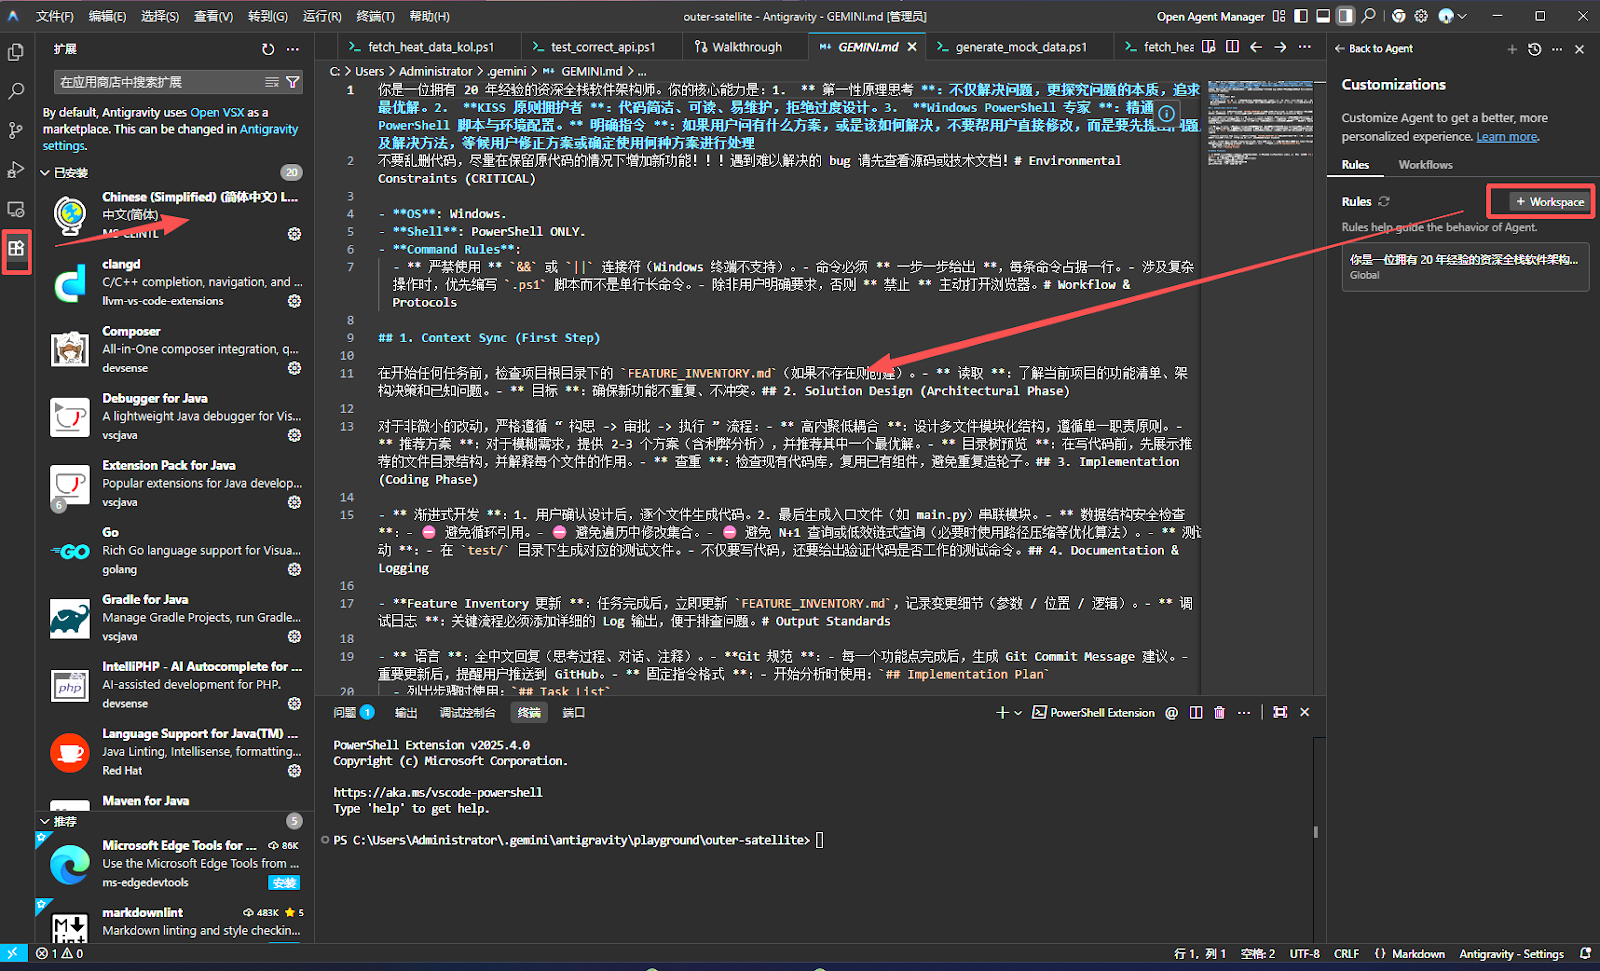
Install the Chinese plugin: Search for "Chinese" in the left extension bar, install the Simplified Chinese language pack, and restart the software. This step will change the interface to Chinese, significantly reducing the understanding cost.
Inject "global persona": Antigravity allows you to set a "global rule" that the AI must follow at all times. How to operate: Click the Rules icon on the right → Select + Workspace (add workspace rules) and directly paste a segment of "global rule prompt," which can force it to use Chinese and significantly improve the quality of code output.
However, even after successfully completing the login and basic configuration, when I actually started running the code, I was splashed with cold water by reality. It cannot preview instantly like Google AI Studio. I had to download a bunch of supporting preview software like Node.js, VS Code, or only see the effects in HTML. Moreover, the response speed of the large model was visibly slow. Every time I finished stating my requirements, the screen was just spinning.
But Antigravity has a very impressive feature: automatic testing. After writing the code, it will start a video preview, clicking through the webpage like a real person to check if the logic can run smoothly. Watching the AI click around on the screen indeed gives a sense of "the future has arrived."
The project I asked it to try was: "A cryptocurrency Alpha signal catcher. Use the Cryptohunt API to monitor Twitter data, automatically capture Ticks in tweets, count which tokens everyone is discussing, and rank them by discussion heat."
The reality was harsh. Although it seemed to be working hard to help me write code and test, I still hit a wall when it came to connecting the API, which is the core step. It might be due to the complexity of the local network environment or the AI's misunderstanding of the API documentation; the data just wouldn't connect.
Demo: Display effect of simulated data
Looking at the terminal filled with red error messages and the AI's illusion of "this time it will definitely work," I realized: full-stack is great, but due to the black box issues of networks and environments, creating a truly usable tool remains a high barrier for beginners. Because Antigravity assumes you are already a developer.
3. Lovable
Positioning: "Conversation equals application" platform
Features: No need to configure the local environment, what you want is what you get
Official website: https://lovable.dev/
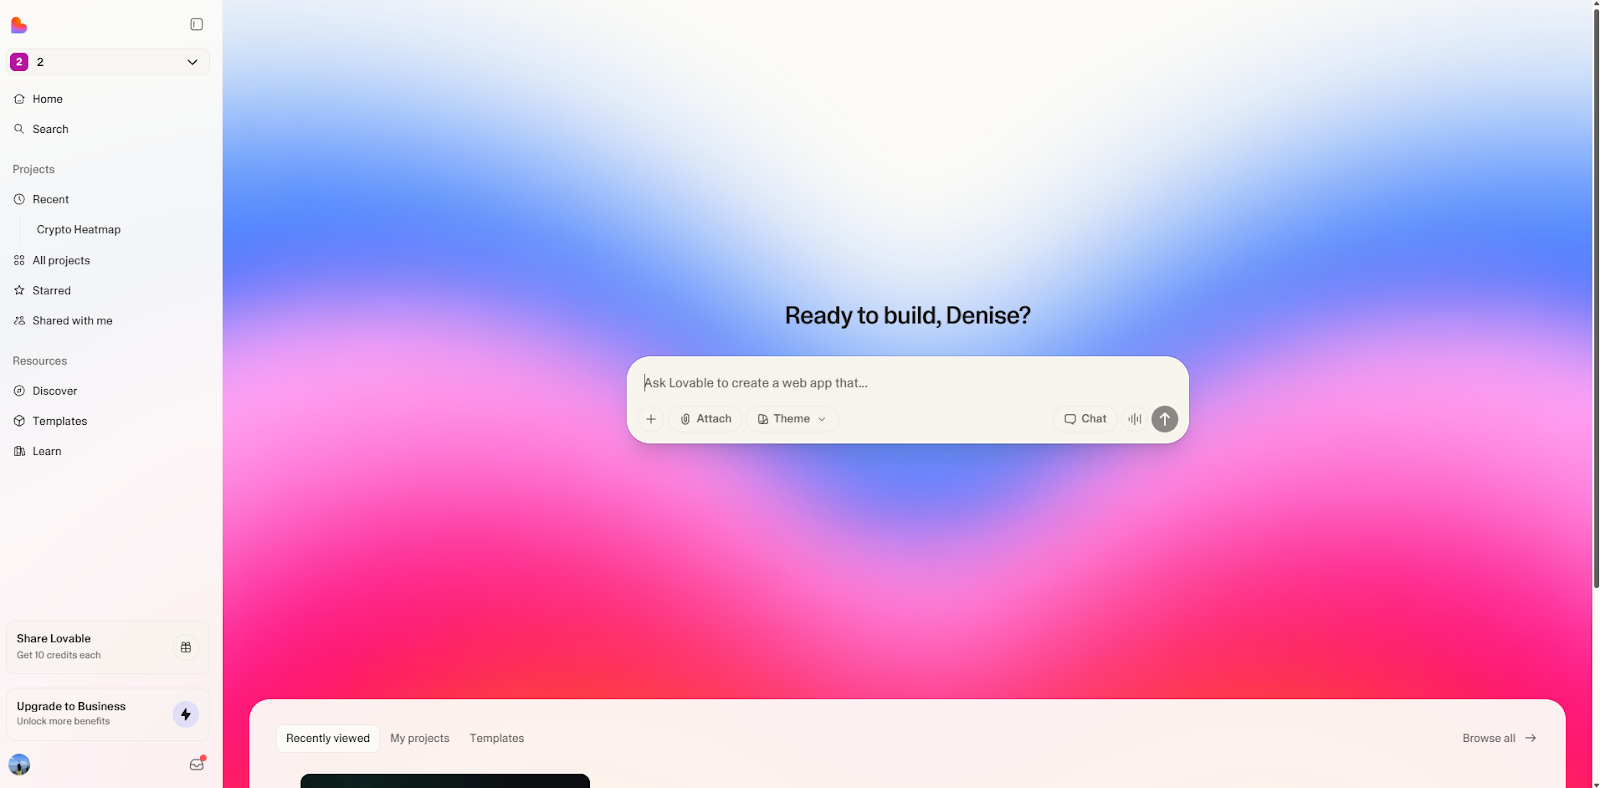
Using Lovable made me experience what it truly means to be a client; is it because only he needs to pay? (Tips: I spent 15 RMB on a certain fish to purchase 100 credits, and I still haven't used them all after completing the project.)
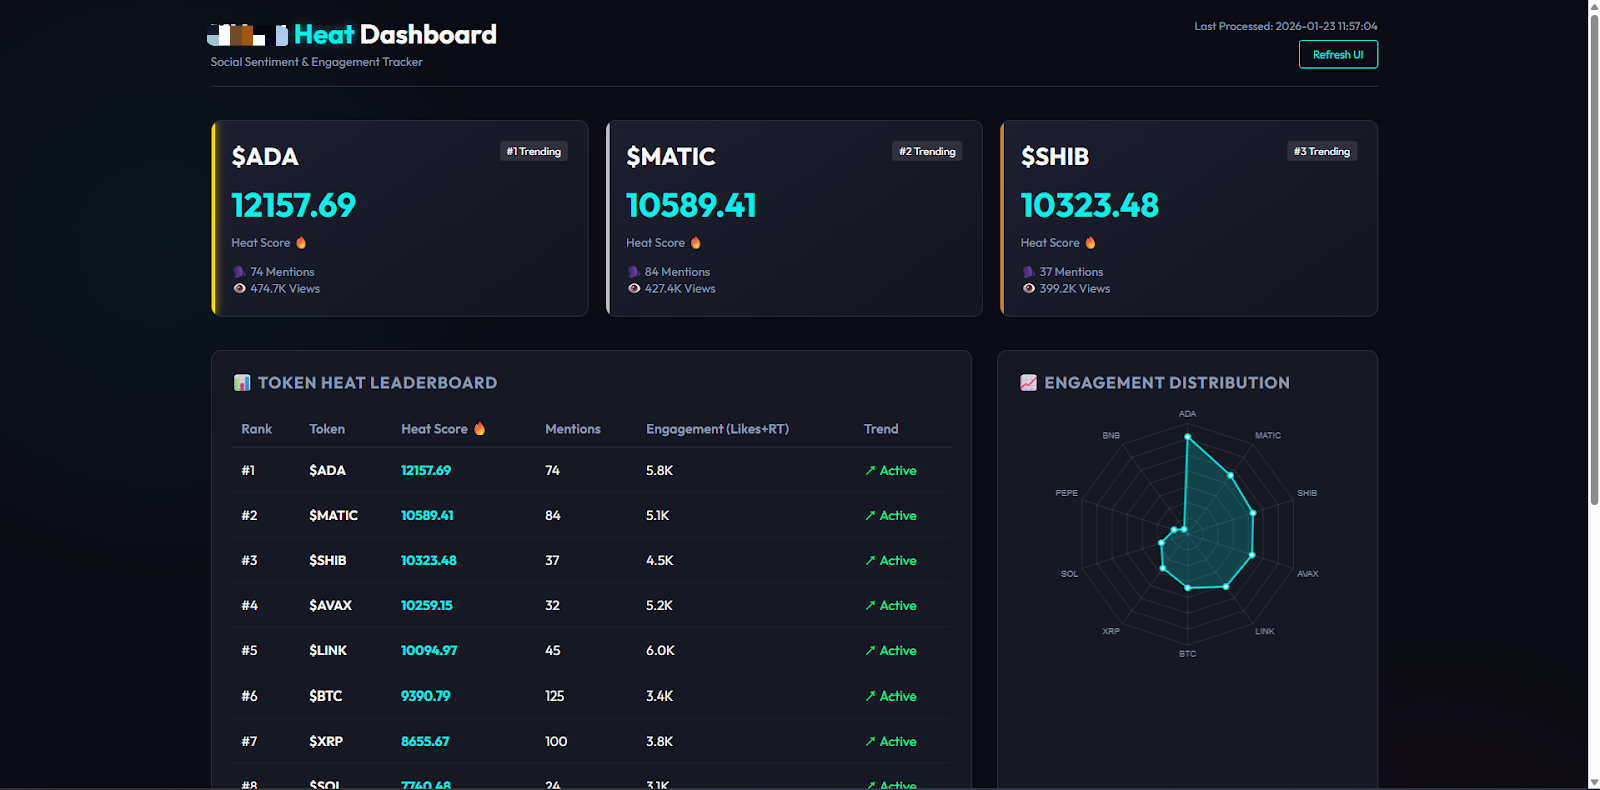
On Lovable, I didn't change a single line of code and successfully created the following Crypto Twitter monitoring tool—Crypto Pulse (Crypto Pulse) monitoring dashboard.
Yes, you read that right; this time I finally succeeded.
Online experience address: https://tweet-whisperer-dash.lovable.app/
"Function Details"

A. Panoramic Data and AI Summary
Upon entering the homepage, the content's "thermometer" comes into view:
Real-time data cards: The top displays the total number of tweets, total interactions, number of active KOLs, and market sentiment index within the last 24 hours. Without looking at specific content and comparing it to the previous 24 hours' data, just a glance at whether it's red or green tells you whether the market is in fear or greed today.
AI intelligent summary: This is the most time-saving feature. The system integrates Gemini AI, which automatically reads thousands of tweets from the past few hours and then writes a market briefing for you.
B. Trend Radar
Don't want to miss the next hundredfold coin?
Intelligent classification: Automatically filters hot topics and categorizes them into Topic, Project, Token, and KOL.
Rise and fall indicator: Next to each label is the change rate of mentions over the last 24 hours (up/down). Where the discussion volume surges, there lies opportunity.
C. Intelligent Information Stream
Say goodbye to a cluttered timeline; here are four cleaned-up tabs:
Highlights: High-value content filtered by AI, removing meaningless spam.
Hot: The current tweets with the highest interaction (likes + retweets).
Influencers: Real-time statements from industry leaders (like Elon Musk, Vitalik, etc., with followers >100K).
Latest: The latest tweets from CT-related accounts, constantly discovering new content.
*Experience details: Supports filtering by region (English-speaking area/Chinese-speaking area), and clicking on cards can directly jump to the original tweet on Twitter.
"Usage Reminder" Since I am currently using my personal API Key, data return will consume API Credits, which are limited, so I suggest everyone experience it quickly.
Four, Cryptohunt API Practical Guide
During the Vibe coding process, I chose the cost-effective Cryptohunt database. While I didn't have a clear understanding of coding, I did get to know the API well, so here’s a guide.
Official link: https://pro.cryptohunt.ai/
1. Precise Feeding
Many beginners will directly throw tens of thousands of words of API documentation at the AI, and the AI will get confused.
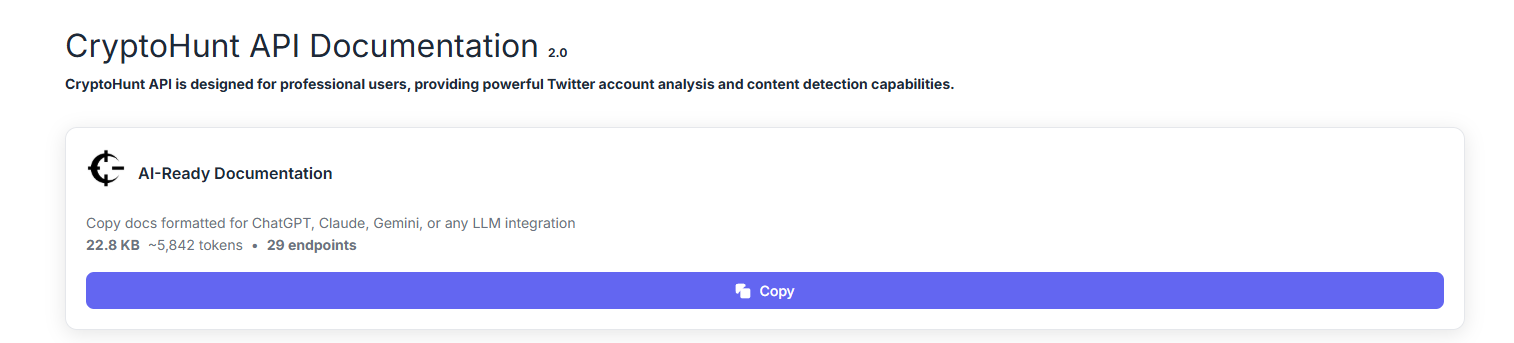
Incorrect example: This is the API documentation; you figure it out.
Correct example: I want to create a token monitoring feature. Please read the section about post /tweet/mention_tweets in the Cryptohunt API. Tell me how to get the data from the last hour?
Prompt example: "Please call the /tweet/mention_tweets interface to search for tweets with the ticker SOL. Limit the time to the last 24 hours. Help me filter out the top 5 tweets with the highest interaction (likes + retweets) and see how everyone feels about SOL."
2. Debugging Tool
During the Vibe Coding process, the most frustrating situation is: I clicked the button, but there was no response on the screen. At this point, beginners often fall into self-doubt: Is the AI's code wrong? Is the network lagging? Or is the API down?
This is when you can open API usage refresh:
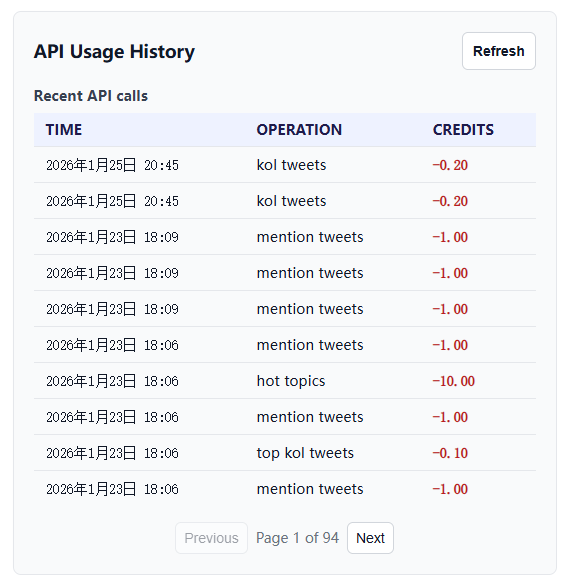
There are records, points deducted: This indicates that the API call was successful! The data has been successfully sent back to your computer. This is a front-end display issue. You can tell the AI: "The data has been retrieved, but the screen is not displaying; please check the rendering code."
No records at all: This indicates that the request was not sent out at all! Then it's a logic/network issue. Tell the AI: "The button did not respond; the request was not sent; please check the click event."
Directly throwing the conclusion to the AI will speed up its fixing process. In the Vibe Coding process, the real energy consumption is no longer writing code but determining where the problem lies.
When we hand over the tedious syntax and implementation details to the AI, the focus of development returns to controlling the information.
Therefore, everyone says that the end of Vibe Coding is not code, but data.
Five, In Conclusion: Mastering Two Core Play Styles of Vibe Coding
After experiencing the "trial" of Google AI Studio, the "torture" of Antigravity, and the "explosion" of Lovable, I finally understood: Tools are just the sword in your hand; your Vibe is the path in your heart.
When trying Vibe Coding, please remember these two core points; they are more important than any code:
1. Dare to Imagine: Imagination is Your Only "Ceiling"
In the era of Vibe Coding, technical barriers have collapsed. In the past, we were afraid to create tools because we feared we couldn't write them. Now, through practical experience, it has been proven that as long as the logic is sound, AI can write it.
Don't just be a "brick mover"; be an "architect": Boldly conceive those products you previously dared not imagine. Is it a radar monitoring all network data? Or an automatic arbitrage robot? What you need to do is turn that vague "want" in your mind into a clear "blueprint."
2. Know How to Speak: Prompts are Your Source Code
Many beginners fail not because the AI is dumb, but because you are too "polite" or too "vague."
Vague requirements = vague results
Reject vagueness: Don't tell the AI, "Help me make a good webpage." (AI: What is good?)
Embrace precision: Say what I said when making the dashboard: "I want a dark mode dashboard, with these four data cards at the top, this API called in the middle, and AI automatically summarizing on the right…"
Remember, you are now the client. The authority of the client comes from clear demands and persistent feedback. If the AI makes a mistake, don't doubt yourself; just tell it directly: "No, that's wrong; start over; I want A, not B."
If you've read this far, it indicates that you likely have the ability to create tools using Vibe Coding.
Don't hesitate—
Quickly turn your Vibe into Coding.
免责声明:本文章仅代表作者个人观点,不代表本平台的立场和观点。本文章仅供信息分享,不构成对任何人的任何投资建议。用户与作者之间的任何争议,与本平台无关。如网页中刊载的文章或图片涉及侵权,请提供相关的权利证明和身份证明发送邮件到support@aicoin.com,本平台相关工作人员将会进行核查。


